This page explains the different parts and features in a purchase order.
Header
The blue bar at the top of the header displays the PO ID and the status of the purchase order.

Left Column
- PO ID – The unique identifier assigned by the system for the purchase order.
- PO Name – Defaults to the purchase order ID. You can click on the blue name link the change the name. If the name you enter is already in use a message will appear with a link to the PO that has that name.

- Provider – The selected provider for the purchase order. The link takes you to the provider record.
- Line Items – The number of line items on the PO.
Center Column
- Status – Displays he status of the purchase order. Possible statuses are
- Pending/Activatable – The purchase order has not yet been activated but is activatable.
- Pending with a message as to why the purchase order is not activatable.
- On Order – The purchase order has been activated.
- Cancelled – The entire purchase order has been cancelled using the “cancel” button in the header.
- Received – ALL line items and items in the purchase order have been received.
- Pending/Activatable – The purchase order has not yet been activated but is activatable.
- Activated – Purchase orders that have been activated have a date. “N/A” displays for purchase orders that are pending.

- Allow Activation with Zero-Item Line Items? – Check this off if you want to allow the purchase order to be activated without items attached to the line item.


Right Column
- Estimated Amount – The sum of the line item estimated prices.
- Encumbered Amount – The current encumbered amount for the purchase order. As line items are invoiced the encumbered amount goes down.
- Spent Amount – The total amount that has been invoiced for the purchase order. As line items are invoiced the spent amount goes up.
- Prepayment Required? – This option is set to either Yes or NO when the purchase order is created.
Horizontal Links
- Notes (#) – Appears in both pending and activated POs. To add a note to the purchase order click on the blue Notes(#) link. A box will appear where you can enter note text and select the Vendor Public checkbox if the note should be sent to the vendor. Click the New Note button to add the note or the red X to remove the note.
- EDI Messages (#) – Appears in both pending and activated POs. If the PO is an EDI order, the (#) will display the number of EDI messages associated with the PO. It is also a link to view the EDI messages associated with the PO if you are authorized.
- History – Clicking on the blue History link will show you the purchase order history table which includes the following fields: Cancel Reason, Create Time, Creator, Edit Time, Editor, Name, Order Date, Ordering Agency, Owner, Prepayment Required, Provider, and Status fields display by default. Under the gear option in grid actions you can also display Audit Action, Audit ID, Audit, Time and Purchase Order ID.
- Print – (Appears in both pending and activated POs) Clicking on this link retrieves a printable purchase order.
- Invoices (#) – (Appears in activated POs) The number of invoices associated with the PO displays in the parentheses. Clicking on this link takes you to the Invoice Search interface and displays a list of the invoices associated with the PO.
- Create Invoice – (Appears in activated POs) Allows you to create an invoice directly from the PO.
- Link Invoice – (Appears in activated POs) Allows you to link an existing invoice to the PO.
- Cancel order – (Appears in activated POs) This button allows you to cancel the entire purchase order. If the status of the purchase order is received, pending, or cancelled, the button does not appear.
- EDI Messages (#) – (Appears in both pending and activated POs) The number of EDI messages associated with the PO displays in the (#). (0) will display for pending POs. Clicking on the link takes you to a list of the EDI messages. Clicking the Return button returns you to the purchase order.
- Activate Without Loading Items – Appears in pending POs – Clicking this button will activate the PO but will not load bibliograghic and on order item records into the catalog. The total estimated amount for the PO is encumbered when the button is clicked.
- Activate Order – Appears in pending POs – Clicking this button loads bibliographic records and on order items into the catalog. The estimated amount for the PO is encumbered when the button is clicked.
- Show PO in Legacy Interface – Takes you to the old PO interface. This is useful if you need to batch update funds in line items when the PO has been activated.


Purchase Order Actions Menu
Allows you to preform various actions on the purchase order including receiving or cancelling selected line items. The actions available will depend on the current status of the purchase order.

- Active for Purchase Order in any Status
- Export Single Attribute List
- Print Purchase Order
- View PO History
- Apply Claim Policy to Selected Line Items
- Active if Purchase Order Status is pending and one or more line items is selected
- Add Brief Record
- Delete Selected Line Items
- Add Items to Selected Line Items
- Batch Update Items on Selected Line Items
- NOTE: Currently, if you need to batch update funds in an activated PO you will need to go to to the legacy purchase order interface.
- Export Single Attribute List for Selected Line Items
- Load Bibs and Items
- Apply Claim Policy to Selected Line Items
- Active if Purchase Order Status is On Order
- Export Single Attribute List for Selected Line Items
- Mark Selected Line Items as Received
- Un-receive Selected Line Items
- Cancel Selected Line Items
- Apply Claim Policy to Selected Line Items
- Create Invoice From Selected Line Items
- Link Selected Line Items to Invoice
Batch Updater
Allows you to apply values to selected line items in batch.
To use the Batch Updater:
- Select the line items you want to update.
- Click on the PO Actions menu
- Select Batch Update Items on Selected Line Items
- The Batch Updater appears.
- Fill in the fields you want to update.
- Click the Batch Update button.
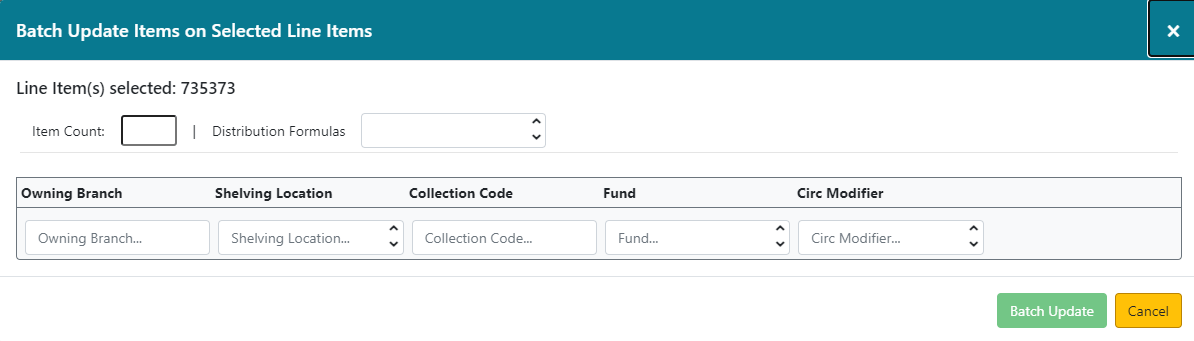
Fields in the Batch Updater:
- Item Count – Enter the number of copies being ordered for the line item.
- Distribution Formula – (optional) Values for the above fields saved as a group. You can have multiple distribution formulas. See more about Distribution Formulas.
- Owning Branch – The three letter code for your library. For example: WAK
- Shelving Location – If none selected the default of On Order will be used.
- Collection Code – (optional) Free text
- Fund – The fund the cost of the line item will be encumbered in and expended from.
- Circ Modifier – The circulation modifier being used for the item.
Line Item Selection
There are 3 options for selecting line items. The number of line items selected is reported next to the checkbox options:
- Select one or more line items individually by checking off the box next to the title.

- Line Items In Page – Checking off this option will select line items currently displaying on the page.
- All Line Items – Checking off this option will select all line items in the purchase order even if they are not currently displaying on the page.

Line Item Sort Options
Line items may be sorted and filtered in various ways. To show the the filter and sort options click on the Show Filter & Sort Options button.

You can hide the filter and sort options by clicking the Hide Filter & Sort Options button.

To Filter
- Select the field you want to filter by from the dropdown.
- Select the operator from the dropdown.
- Enter the text to filter by.
- Click Apply Filter
To Remove Filters
- Click the Reset Filters button.
To Sort
- Select the sort from the Sort by dropdown.
- Line items will automatically sort based on the sort selected.
Filter by:

Operators:

Sort by:

Adding Line Item Notes
You can add notes to line items in batch by using line item note updater that appears above the line item list.
- Select the line items you want to add a note to.
- Fill in the “New Line Item Note...” box with the note you want to add.
- If you want the note to be sent to the vendor, check off the “Note is vendor-public” checkbox.
- Click Apply To Selected.

Line Items
Line items are the titles you are ordering. A purchase order can have up to 100 line items. More than 100 line items is not recommended.
For more about line items see (New) Line Item Overview
Direct Charges

Charges and fees that you want to encumber can be added to a purchase order using the New Charge option at the bottom of the purchase order screen. See Direct Charges for more information.