Invoices expend funds encumbered by a line item or direct charge on a purchase order. You can also expend funds directly on an invoice using a Direct Charge.
Anatomy of an Invoice
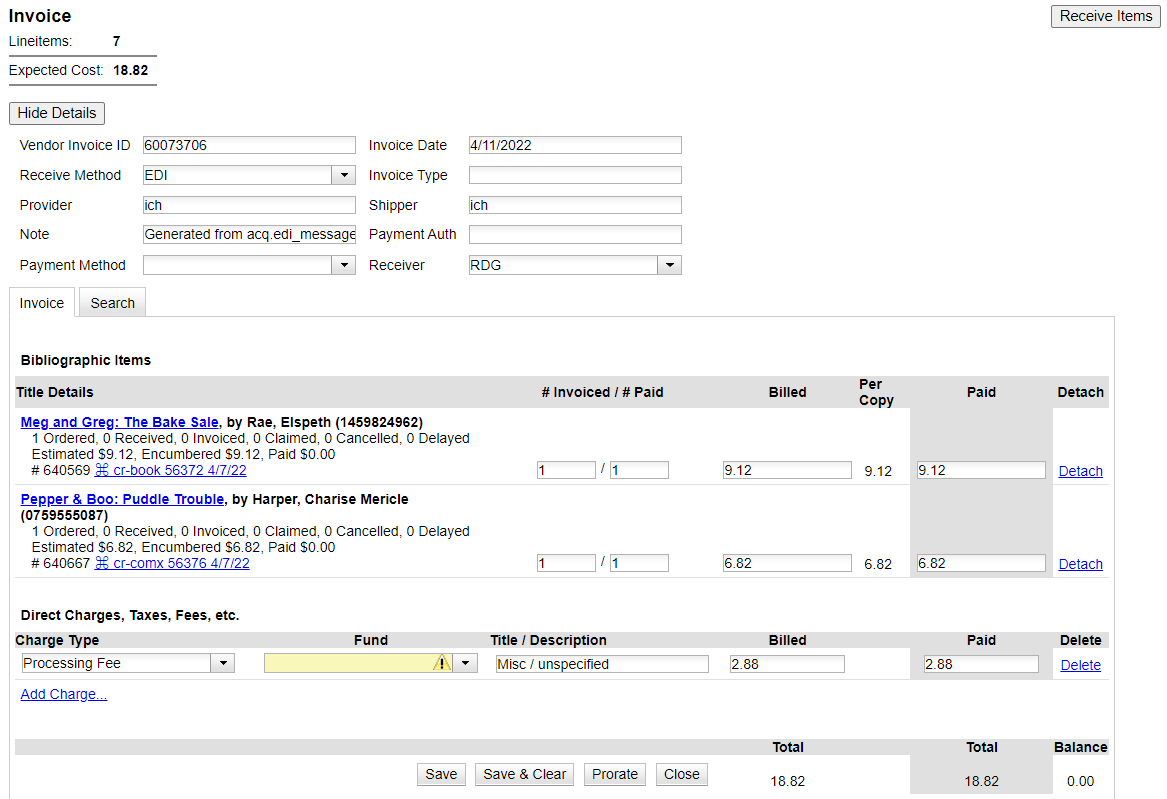
Lineitems – The number of line items on the invoice
Receive Items button – Click to go to the receiving screen to receive items on the invoice.
Expected Cost – Total cost for the invoice.
Hide/Show Details button – Hides or shows the invoice header fields.
Invoice Header Fields

Vendor Invoice ID (required) – The vendor’s invoice number on the invoice.
Invoice Date (required) – The date on the invoice. The form defaults to todays date. Clicking in the box will pop up a date widget from which you can choose the date on the invoice.
Receive Method – Choose the appropriate option from the dropdown.
Invoice Type – Free text field.
Provider (required) – This is a typeahead box. Start typing the provider code and select it from the list when it appears.
Shipper (required) – This is the same as the Provider. It fills in automatically when the Provider is chosen.
Note – A free text field. EDI messages also display here. Additional notes can be added if EDI messages are present.
Payment Auth – Free text field.
Payment Method (required) – Choose the appropriate option from the dropdown.
Receiver (required) – Choose the appropriate org unit from the dropdown.
Tabs
Invoice tab – Lists the line items and direct charges (if any) on the invoice.
Search tab – Takes you to the line item search interface where line items can be retrieved and added to the invoice.
Bibliographic Items Section
Title Details

Bibliographic Information
Blue title link – will take you to the line item details view in the purchase order. Clicking on the return to invoice button will bring you back to the invoice.![]()
Author – The author of the title you are ordering
ISBN – The ISBN of the title you are ordering
Order Status Information
Number of items Ordered – The number of items added to the line item.
Number of items Received – The number of items on the line item that have been received.
Number of items Invoiced – The number of items on the line item that have been invoiced.
Number of items Claimed – The number of items on the line item that have been claimed.
Number of items Cancelled – The number of items on the line item that have been cancelled.
Number of items Delayed – The number of items on the line item that are delayed.
Money Information
Estimated – The Estimated Price entered for the line item on the purchase order.
Encumbered – The amount of money the line item is encumbering.
Paid – The amount of money that has been invoiced for the line item.
Line Item Information

Line item ID – The unique identifier for the line item. [Note: When contacting NOBLE about a line item you will want to include the line item id.]
Blue purchase order link – Takes you to the purchase order when clicked.
Items (copies) and cost

# Invoiced / # Paid – Filled in automatically for EDI invoices. Both fields need to be filled in if invoicing manually. The number in both fields should be the same.
Billed – Filled in automatically for EDI invoices. Fill in the billed amount from the paper invoice for manual invoicing. Clicking Tab or clicking outside the billed box will automatically fill in the Paid amount.
Per Copy – The price for each copy automatically displays here.
Paid – Filled in automatically for EDI invoices. For manual invoicing, the Paid amount will be filled in from the Billed amount. The Billed and Paid amounts should always be the same.
Detach – Click this to remove a line item from the invoice.
Direct Charges, Taxes, Fees, etc.
Direct charges can be used to encumber and/or expend funds without an associated line item. Direct charges can be used for shipping fees, handling fees, taxes, credit memos, etc. There is also a special direct charge for blanket orders where you can encumber an amount in a purchase order and expend that amount over a period of time through invoicing. Credit Memos are used to apply a vendor credit to a fund.

There are a number of charge types to choose from.
- All charges, except for Credit Memo can be used in a purchase order to encumber funds.
- All charges except for Blanket Order can be used in invoices to expend funds.
- Prorated charges are split across the line items when the “Prorate” button us used otherwise a particular fund is selected from the Fund dropdown.
Charge Types
- Tax
- Handling Charge
- Non-Library Item
- Serial Subscription
- Credit Memo – Should only be used in an invoice. Used to negate an invoiced amount. Credits are usually issued by the vendor and should be entered into Acquisitions if the invoice has been finalized.
- Salesman’s Order
- Standing Order
- Library Item
- Processing Fee
- Shipping Charge
- (Prorated) Shipping Charge – Use with the Prorate button.
- (Prorated) Processing Fee – Use with the Prorate button.
- (Prorated) Handling Charge – Use with the Prorate button.
- Blanket Order – Should only used in a purchase order.
- Database
Fund – Select the appropriate fund from the dropdown. Charges that come in on an EDI invoice will need to have a fund selected manually.
Title/Description – (optional) A free text field used to describe what the charge is for. If the charge if for a particular title, database, etc., it is a good idea to enter that here.
Billed – Amount billed on the invoice
Paid – Should always be the same as the billed amount
Delete – Clicking on the Delete link will delete the charge from the invoice. The invoice must be open to delete a charge.
Actions and Totals

Save – Saves the invoice. Saving the invoice does not disencumber or expend money. Use Save when you need to come back to the invoice at a later time to finish it.
Save & Clear – Saves the invoice and clears the form so you can enter a new invoice. This does not Close the previous invoice.
Prorate – Applies the selected prorated charge to the funds. It does not save or close the invoice.
Close – Finalizes the invoice. Closing an invoice is the process that moves your money from being encumbered to being “spent”. You also need to close invoices before you can print the invoice and see the “Amount Spent by Fund” portion of the printed invoice in Acquisitions.
Total – Total amount billed
Total (grey background) – Total amount paid
Balance – The difference between the total billed and total paid amounts. This should always be 0.00. If you see an amount other than 0.00 check the billed and paid amounts you entered for errors. You will not be able to close an invoice if the balance is not 0.00.
Reopen – The Reopen button appears when an invoice has been closed. Clicking the Reopen button puts the invoice back into an editable mode so that you can make corrections, if necessary. Always remember to close the invoice again after you have finished editing it.