In the Acquisitions module, money is encumbered and expended through funds. Funds allow you to set and track spending for areas of your collection. You can define those areas however you like. It can be by collection (e.g. juvenile), by subject area, by format, by branch, by department. It can be a combination of these.
Deciding on Your Fund Setup
Here are some questions to ask yourself when trying to decide how to organize your funds:
You may want to take into account how your bookkeeping is set up. How will you translate expenditures in Evergreen to your accounting software? Does this matter to you or do you just want to use your funds to get an estimate of what you have encumbered and what you have spent?
What will you want to pull statistics on? Expenditures for a branch? Expenditures for a collection? Expenditures for a format?
If you get processing done on materials, are processing charges billed to one particular fund/account created for that purpose or is that cost rolled into the per-item price?
If you have branches do you budget money specifically for your different branches?
If you would like to have funds in your grid codes on Baker & Taylor’s TS360 site, be aware that there is a 26 character limit per fund code. So name your funds accordingly.
About the Funds Tab
In this tab you can create a new fund, edit a fund, inactivate a fund, deleted a fund*, perform fiscal close, and search for existing funds. The fund grid can be configured, using the grid options under the gear icon, to show the full status of your funds, including encumbered and spent balances, across all your funds.
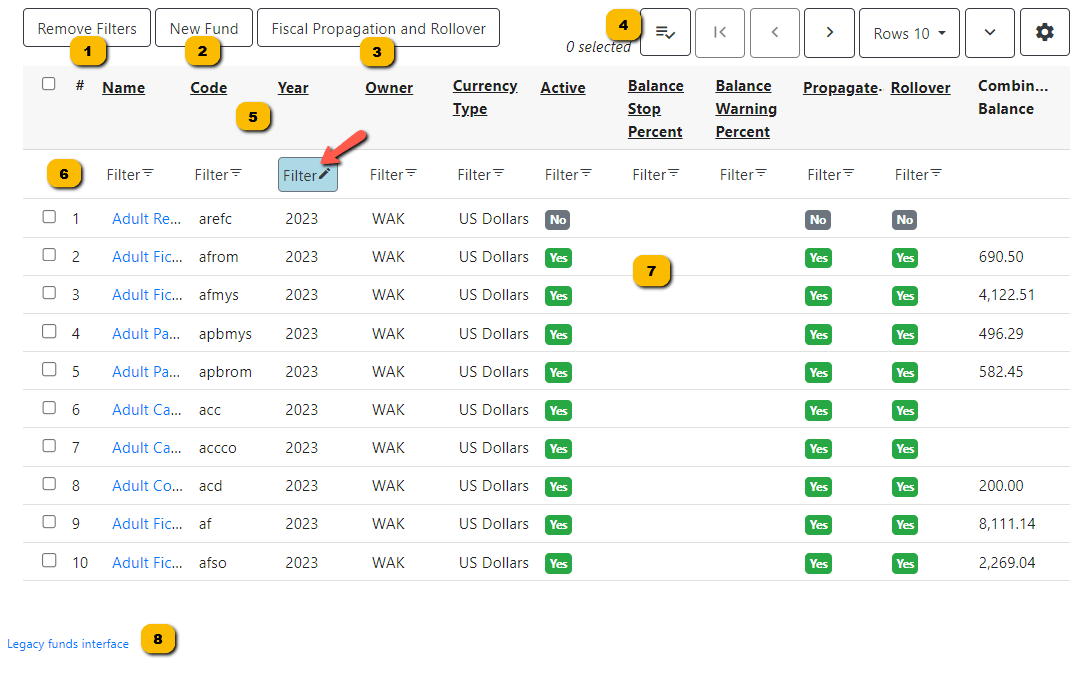
- Remove Filters – Clears all filter that have been set.
- New Fund – Click to create a new fund.
- Fiscal Propagation and Rollover – Click to access fiscal close functions.
- Grid functions
- Grid Actions, Delete Selected, Edit Selected, View Selected.

- Paging functions.

- Expand rows vertically to see full text.

- Grid configuration.

- Grid Actions, Delete Selected, Edit Selected, View Selected.
- Column headings – Columns are sortable. Click twice on the column heading to reverse the sort order. Note: Money columns are not sortable.
- Filters – Filters are specific to the type of data. Note: Money columns are not filterable.
- Note: The Year is filtered to the current Calendar year by default. If you are in the first half of the fiscal year you will need to set the Year filter accordingly when you come to this screen.
- Search results
- Legacy Fund Interface – Link to old fund interface.
Create a New Fund
- Click on the New Fund button.
- Fill in the form. Fields are explained below. Red highlighted fields are required.
- Click Save.

- Name – Enter the name of the fund
- Code – Enter the code for the fund. The code should be all lowercase without spaces.
- Year – Enter the fiscal year the fund applies to. (Ex. 2022)
- Org Unit – Select your org unit from the dropdown. If the system level is selected, all branches will see that fund. If the branch level is selected, only that branch will see that fund. NOTE: If you do centralized ordering for your branches it is best to set all funds at the system level. The fund name and code should start with the branch name.
- Currency Type – Select the appropriate currency from the dropdown. Usually US Dollars.
- Active – This box should be checked if you are actively using the fund.
- Balance Stop Percent – The point at which the system will stop you from spending money from the fund. (ex. If you enter 95 the system will stop you when you have spent 95% of the fund.)
- Balance Warning Percent – The point at which the system will warn you that you have spent the stated percentage of the fund.
- Propagate – Check this box if you want to bring this fund over to the next fiscal year. This will not bring over any money or encumbrances, only the fund itself.
- Rollover – Check this box if you want to move any unspent money or encumbrances over to the new fiscal year. If you want to just bring over encumbrances and not unspent money, there is an option to do that when you do your fiscal close, but Rollover must be selected in the fund to use that option. NOTE: If you select Rollover you must also select Propagate.
Actions for a Fund (Edit, Delete, View, or Copy)
- To Edit – Double click on the fund row. The record editor appears where you can edit the fields in the fund record.
- To Edit/Delete/View – Select the fund by clicking once on the fund row or by checking the checkbox to the left of the fund. Then click on the Actions button and select Edit/Delete/View Selected.
- To Edit/Delete/View/Copy – Right click on the fund row to see the Actions for Selected Row menu. From here you can Edit, Delete or View the fund. You can also Copy the fund information to your Clipboard.
*Note: Funds can only be deleted if the fund has no transactions. You can, however, make a fund inactive by unchecking the Active box in the fund record when editing the fund.
Mark a Fund Inactive
When a fund is inactive it does not appear in your fund dropdowns. It does, however, continue to display in the fund grid.
When a fund is propagated and rolled over at fiscal close, the previous years fund is automatically marked inactive.
To manually make a fund inactive:
- Open the fund record for editing.
- Uncheck the Active box.

- Click Save.
Fund Details
To see the details of a particular fund, click on the blue Name link in the fund grid.

The Fund Details screen is a tabbed interface where you can access the following:
- the fund summary
- allocations that have been made to the fund
- money that has been transferred to the fund
- debits that have been made to the fund
- fund tags associated with the fund
You can also do the following from this screen:

- Create an allocation from a funding source to the fund
- Transfer money from the fund to another fund
- Edit the fund record
- Set a default view for the screen