Records can be loaded through the MARC Batch Import/Export interface (previously known as Vandelay). Loading MARC order records with on order item data requires some setup both on the Evergreen side and the vendor side. See Setup for Batch Loading Bibs and On Order Items for more information.
The MARC Batch Import/Export interface can be reached from either the Portal page or from the Cataloging menu. From either place choose MARC Batch Import/Export (New Interface).
Template Setup
If you haven’t used this interface before, the first thing you will want to do is set up a default template. This is recommended even though some of the fields in the form will default to values based on your library settings. Creating and setting a default template ensures that all fields in the form will automatically be loaded whenever you go to the MARC Batch Import/Export interface. The only thing you will need to select is the file you are uploading. You will need to set up the template at each workstation where you upload records.
- Set the fields indicated below:
- Apply/Create Form Template – Enter a name for the template you want to create. Here we are using “Load Records.” You can use whatever name you want.
- Record Type – Defaults to, and should remain set to, “Bibliographic Records.”
- Record Match Set – Select “Load Orders” from the dropdown.
- Merge Profile – Select “Load Orders” from the dropdown.
- Select a Record Source – Select “Temp” from the dropdown.
- Import Non-Matching Records – Should be checked
- Merge On Best Match – Should be checked
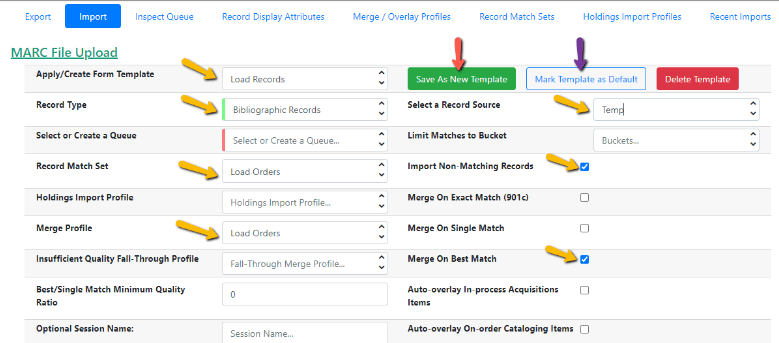
- Click Save As New Template
- Click Mark Template as Default (marking a template as default means that the template will automatically be applied whenever you go to the MARC Batch Import/Export interface. Note: Templates are associated with the workstation.
Load a File of MARC Records
- Go to MARC Batch Import/Export from the Cataloging menu.
- Check that your template is set.
- Enter a unique queue name in the box next to Select or Create a Queue.

- Click the Choose File button and select the MARC file from your computer.
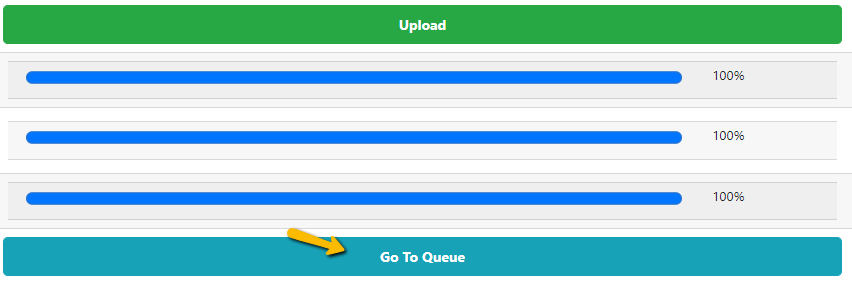
- Click Upload

- Evergreen will display the progress of the upload.

- When all progress bars reach 100% a Go To Queue button will appear.
- Click on the Go To Queue button.
- In the upper left corner of the screen under Queue Summary, check that all records have loaded. Import failures will appear here.

- Under Queue Actions click Copy Queue to Bucket. This puts the records in a record bucket so that you can easily attach items later.

- In the dialog box that appears, click on the New Bucket tab.
- In the box to the right of Name of New Bucket enter a name for the bucket.
- Click Add to New Bucket. [Note: Additional record uploads can be added to the same bucket in the Existing Bucket tab by selecting the bucket from the dropdown.]

- Under Queue Actions click Delete Queue to remove the queue.
- Click on the Import tab at the top to import another file.
